You need to set up a Webhook on Data Center or Cloud to ensure that Backbone receives the information as soon as an issue (or version) changes and can sync it right away.
You only need to set up a WebHook when:
-
You are syncing from Cloud to Data Center with the configuration on the Cloud side
-
You are syncing from Cloud to Cloud, using a remote license
There are two ways to create a WebHook:
Prerequisites
To create a WebHook, you need the following:
-
Be logged in as a user with global admin rights.
-
Have the URL provided by Backbone on Cloud while setting up the sync or in the “WebHook Data Center“ or “WebHook Cloud“ option.
Creating the WebHook Through the UI
Step 1: Determine Your Jira Version
-
If you are syncing to Jira Data Center (DC) version below 10 or to Cloud:
You only need to create the primary WebHook (step 2) -
If you are syncing to Jira Data Center (DC) version 10 or higher:
You will need to set up two WebHooks:-
A primary WebHook for syncing issues (step 2).
-
An additional WebHook for syncing versions (step 3)
-
Step 2: Create the Primary Webhook
-
Select the Cog icon (settings) > System. Under Advanced, select WebHooks.
-
Or navigate there with the following URL: YOUR_BASE_URL/plugins/servlet/webhooks
-
-
Click on “+ Create a WebHook“, located in the top right corner
-
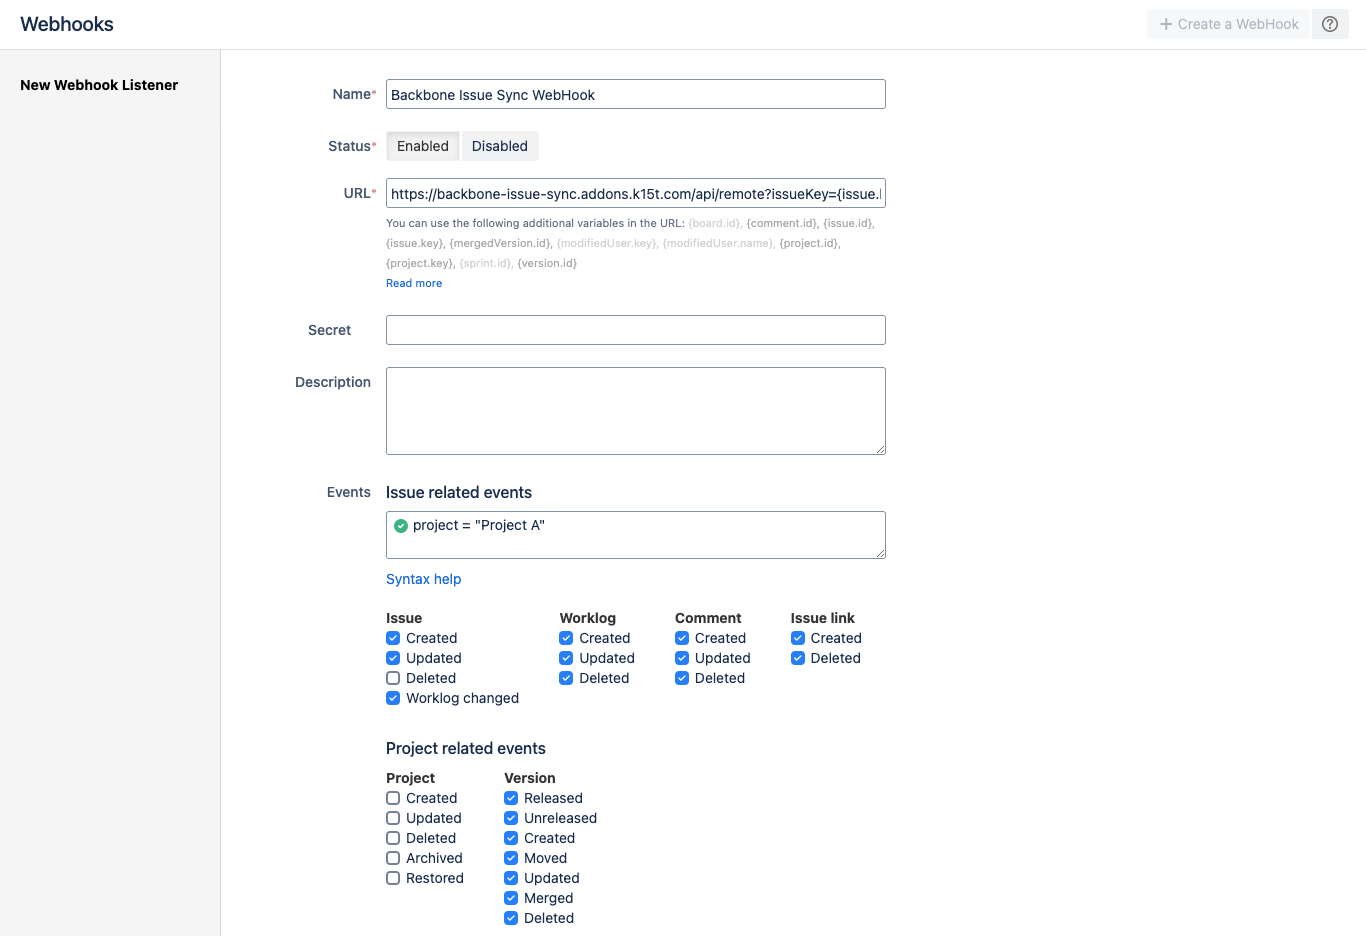
Fill out the following required fields on the form:
-
Name: We suggest naming the WebHook clearly to recognize its origin and function for easier maintenance, like “Backbone Issue Sync WebHook”
-
Status: make sure it’s set to enabled
-
URL: The URL that is copied from the synchronization on Cloud under “WebHook Data Center“
-
-
For events, check the following boxes:
-
Issue Related Events:
-
JQL: use the project key of the project you want to sync, e.g. project = “KEY”
-
Check all the boxes except for issue deleted (and for cloud entity property, attachment and filter)
-
-
Project Related Events: Check all the boxes for the version events (not needed if you need to configure step 3)
-
User Related events, Jira config Related events and Software Related events (Data Center only): Do not check any of the boxes.
-
-
Leave the “exclude body” checkbox unchecked.
-
The WebHook should look something like the screenshot below
-
Click on Create
Step 3: Create the Version Webhook (only Jira 10 and up)
-
Click again on “+ Create a WebHook“, located in the top right corner
-
Fill out the following required fields on the form:
-
Name: We suggest naming the WebHook clearly to recognize its origin and function for easier maintenance, like “Backbone Issue Sync Version WebHook”
-
Status: make sure it’s set to enabled
-
URL: https://backbone-issue-sync.addons.k15t.com/api/remote?projectKey={project.key}&versionId={version.id}&tenantClientKey=a013720e-f798-3438-9082-0d85a9ed9ca5
-
Please replace “tenantClientKey“ with the value from your webhook url
-
-
-
For Project Related Events: check all the boxes for the version events.
-
You can leave all other checkboxes unchecked
-
-
Leave the “exclude body” checkbox unchecked.
-
Click on Create
You now have successfully created both webHooks
Note on the JQL Field
The JQL field is used to limit the WebHooks which are being sent to a certain set of issues, while this might be useful for some, this usually also means a lot more effort with maintaining the Webhook to make sure that Webhooks for all issues which should be synced with Backbone are being sent to our backend at all times.
Creating a Webhook Via Curl
When using curl you can enter the following command into your terminal:
For Cloud to Data Center synchronizations:
curl \
   -u user:password \
   -X POST \
   --data "@Desktop/Create_Webhook_Data.json" \
   -H "Content-Type: application/json" \
   http://localhost:8510/jira/rest/webhooks/1.0/webhook
For Cloud to Cloud synchronizations:
curl \
   -u user:apitoken \
   -X POST \
   --data "@Desktop/Create_Webhook_Data.json" \
   -H "Content-Type: application/json" \
   https://yourinstance.atlassian.net/rest/webhooks/1.0/webhook
For both types of synchronizations:
For this command, make sure to replace the following:
-
user:passwordwith the credentials for a global admin user to your system. -
user:apitokenwith the username and an API token of your Cloud user. -
“@Desktop/Create_Webhook_Data.json"to the actual file path of the file which you can download below.
In the file replace the CLIENTKEY with your actual ClientKey.
If you get a response similar to this, you have successfully created a WebHook:
{"name":"Backbone Issue Sync Webhook","url":"https://backbone-issue-sync.addons.k15t.com/api/issue?auth=CLIENTKEY","excludeBody":false,"filters":{"issue-related-events-section":""},"events":["issuelink_created","jira:version_unreleased","comment_updated","jira:version_created","jira:version_moved","comment_deleted","jira:issue_updated","comment_created","jira:version_released","jira:version_deleted","jira:issue_created","jira:version_merged","issuelink_deleted","jira:version_updated"],"enabled":true,"self":"http://localhost:8510/jira/rest/webhooks/1.0/webhook/34","lastUpdatedUser":"admin","lastUpdatedDisplayName":"admin","lastUpdated":1721284374025}