If you're looking to introduce workflows into Scroll Documents, we strongly recommend using Scroll Documents' native workflow feature as the primary solution. You can learn more about it here: Manage Page-level Workflows
However, if your organization already uses Comala apps such as Comala Document Management or Comala Publishing, and you're exploring Scroll Documents but the built-in workflow doesn’t fully meet your needs, there is a setup you can consider.
This setup involves using Scroll Documents and Comala apps in separate Confluence spaces, enabling you to leverage each tool where it fits best.
Important
However, please note that because there is no official integration between Scroll Documents and the Comala apps , we cannot guarantee long-term support for this setup. Any changes to either Comala's or Scroll Documents code may cause the setup to break, and we will be unable to provide support in such cases.
How to use Scroll Documents and Comala apps together
If you wish to set up a public product documentation that incorporates page workflows (managed by Comala apps), and versioning during the authoring process, consider combining the following apps in a single setup:
To learn more about this setup, continue reading this article.
Manage a Help Center with Comala Apps, Scroll Documents, and Viewport
In the recommended setup, you should enable Comala Document Management and Comala Publishing in a dedicated author/draft space, while enabling Scroll Documents in a dedicated target space.
Advantages of this setup include:
-
Adding workflow management to the author and review process, ensuring that only approved pages are published to the target space
-
Having separate author and reader spaces to minimize the risk of public mistakes
-
Incorporating versioning into your documentation
-
Presenting your documentation as a branded help center
We do not advise adding variants or languages to your Scroll Documents managed target space.
Set up the spaces
-
Create a draft space and enable Comala Document Management and Comala Publishing. For more detailed information, refer to the documentation of the Comala apps:
-
Create your first pages.
-
Use Comala Document Management to review the pages .
-
Create a dedicated target space.
-
Publish the approved pages using Comala Publishing.
-
Navigate to the target space.
-
Enable Scroll Documents on the home page of the space.
-
Save a version of the Working version.
-
Add the first version to Scroll Viewport. For more information see: Publish to a Scroll Viewport Site
Simplified the space setup would look as described below:
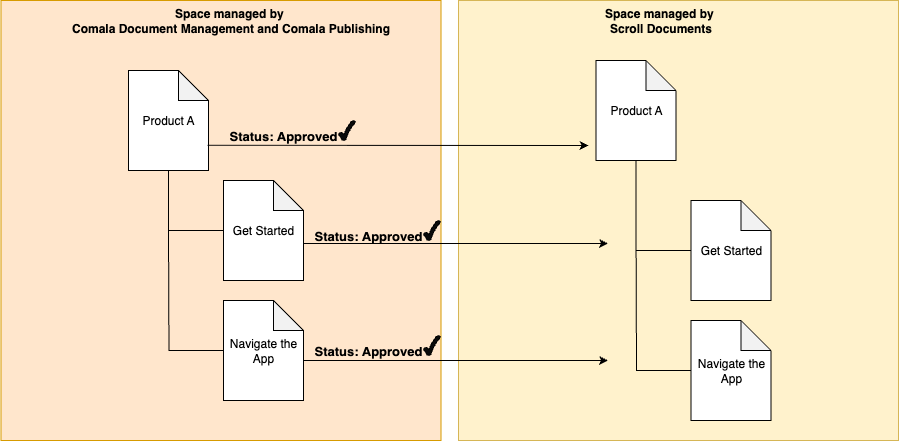
How to continue the workflow and publish management
After the initial publish to the target space and saving of the first version, you can proceed by following the process outlined in the figure below:
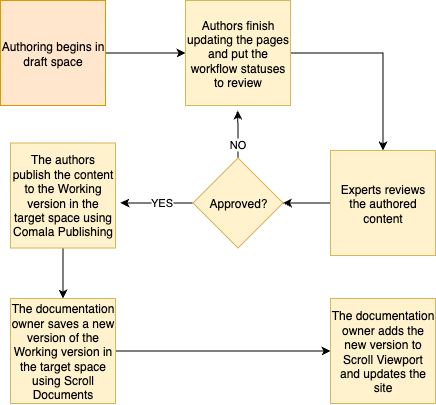
Each time you publish from the author space to the target space, only the pages in the Working version will be updated, meaning any new version you save will not be affected by the next publish. Every new version you save would also need to be added manually to Scroll Viewport afterwards.
The figure below provides a illustration of the authoring and publishing process:
-
The author creates or updates pages in the author space and sets their workflow status to "review" when finished.
-
An expert reviews the content and changes the status to "approved.”
-
Either an automation or the author triggers the publishing of the content to the target space using Comala Publishing.
-
The documentation owner in the target space saves a new version using Scroll Documents.
-
The documentation owner adds the new version to Scroll Viewport.