Scroll Viewport supports switching between different versions of a space if it is managed by Scroll Versions on the same Confluence instance. But there also might be a scenario where you have multiple spaces on a Confluence instance and want to switch between their viewports.
This recipe isn't compatible with the Help Center theme.
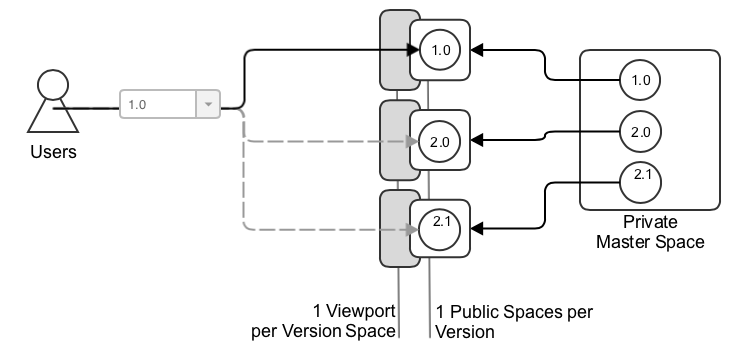
Private Master Space
If you use a private master space, the approach is simple: Just create one viewport per public space.
Advantages:
-
Very fine-grained control over what is exposed through Scroll Viewport
Disadvantages:
-
Overhead for managing multiple viewports.
-
Switching between different versions of the same page, means switching between viewports, which is not available out of the box.
Setting up
This recipe only works when using Hierarchical URLs in the Viewports you want to switch between.
For the following example, let's assume you have 3 spaces which have been published by Scroll Versions to your remote system.
Your space setup may look like this:
|
# |
Space Name |
Space Key |
Viewport Path Prefix |
|---|---|---|---|
|
1 |
Viewport 1.0 |
VPRT10 |
/vprt10 |
|
2 |
Viewport 2.0 |
VPRT20 |
/vprt20 |
|
3 |
Viewport 3.0 |
VPRT30 |
/vprt30 |
The spaces are not managed by Scroll Versions, but you should have successfully installed and configured Scroll Viewport for these spaces. Then, you can use Scroll Viewport to switch between spaces by adding a few lines of code to your Viewport theme.
If you are using the built-in Scroll Webhelp theme, please have a look Switching Between Spaces Published by Scroll Versions#webhelp.
This is best placed somewhere in your page.vm.
Select different versions
<select id="spaceSelect" class="select">
  <!-- The value represents the Viewport path prefix and the text between <option></option> is visible to the user -->
  <option value="vprt10">Version 1.0</option>
  <option value="vprt20">Version 2.0</option>
  <option value="vprt30">Version 3.0</option>
</select>
This snippet creates a HTML Select element. Each option contains the path prefix of your installed Viewport.
You have to manually insert the spaces and their path prefix to the select options, because only you know the paths that the Viewports are available under.
The next step is to retrieve the current path prefix. It's useful to preselect the HTML Select from above and to preserve the current visited page when changing the viewport. This one-liner should be included into a Velocity template file, because we're trying to access a Placeholder.. Preferably at the bottom of the page.vm.
Retrieve the current path prefix
<script>
var currentPathPrefix = '$viewport.link'.substring(contextPath.length + 1); // returns e.g. 'vprt10' without a leading slash
</script>
Redirecting to another space
The last step is to register a change event handler to your select element in order to get notified if the user selects another space and forward him to another viewport page.
Make sure to have this script in its own javascript file. See Referencing JS/CSS and Image Files. Also, this script requires jQuery, also documented in Referencing JS/CSS and Image Files.
Setup the HTML Select
$(document).ready(function() {
    // Add this to your desired JavaScript file and call the method while initialising
    function spaceSelectSetup() {
		// In case of page not existing in that version, we assume an empty path prefix
		var prefix = window.currentPathPrefix || ''
        // Preselect the HTML Select
        $('#spaceSelect').val(prefix);

        // Add an change event handler which forwards the user to another viewport
        $('#spaceSelect').change(function() {
            // This is the Viewport path prefix written in <option value="pathPrefix">...</option>
            var viewportPathPrefix = this.value;
            // Preserve the current page where the user is. If he is on the home page, the string will be empty
            var currentPagePath = location.pathname.substring(contextPath.length + prefix.length + 1);
            // Change the path of the URL and forward the user
            location.pathname = contextPath + '/' + viewportPathPrefix + currentPagePath;
        });
    }
	spaceSelectSetup();
})
Missing Pages
This snippet can send a user from /vprt10/any-site-you-wish to /vprt20/any-site-you-wish. The site has to be available in both spaces, because otherwise Viewport forwards the user to an error page. If you want to forward the user to your space homepage instead, you have to remove all error*.vm templates (Viewport then fallbacks to page.vm) and set a reference of the $page object to the space home page. For example:
Set the current page to the home page
#if ($statusCode == "404")
  #set ($page = $pages.home)
#end
If the different viewports are available under different hosts, you have to consider this in your JavaScript code, e.g. by using location.href instead of location.pathname. You might also want to use other HTML elements to present a solution to switch the space.
Displaying a latest version
Using the snippet below, you can loop through your versions and also depending on the latest version, display latest in brackets, next to the version.
<select id="versionSelect">
	#set($defaultVersionName = $versions.default.original.name )
	#foreach( $version in $versions.available )
		#if ($version.name != "latest")
			#if($defaultVersionName == $version.name)
				#set($versionName = "latest")
				#set($versionDescription = "(latest)")
			#else
				#set($versionName = $version.value)
				#set($versionDescription = "")
			#end
			<option value="$versionName" #if($version.name == $versions.current.name) selected #end>
				$version.name $versionDescription
			</option>
		#end
	#end
</select>
Implementing the version picker with the existing Webhelp theme.
You can use the behavior of the custom select, but override the way how the URL is found out for the other versions.
Step 1: add this to your page.vm, error.vm and any other context pages that you want to select pages on:
<script>
    var currentPathPrefix = '$viewport.link'.substring(contextPath.length + 1); // returns e.g. 'vprt10' without a leading slash
</script>
Step 2:In your include/include-sidebar.vm, replace the entire code between ## --- START and ## --- END with the following:
#if ((!$versions || $variants || $languages) && (!$isError || $contentContext))
  <section class="ht-scroll-versions-widget">
      <form action="">
          #if ($isError)
               <input type="hidden" name="context" value="$contentContext">
          #end

          #if($searchRequest)
               <input type="hidden" name="q" value="$searchRequest.queryString"/>
          #end


           <div class="ht-scroll-versions-select">
                  <label for="ht-select-version">Version</label>
                    <div data-type="master-private-space" class="ht-select-container">
                      <select id="ht-select-version" class="sp-picker" name="scroll-versions:version-name" tabindex="-2">
                        <option #if($repository.key.toLowerCase() == 'spacekey1') selected #end value="spacekey1">VERSIONNAME 1</option>
                        <option #if($repository.key.toLowerCase() == 'spacekey2') selected #end value="spacekey2">VERSIONNAME 2</option>
                      </select>
                    </div>
            </div>


            #if($variants)
                 <div class="ht-scroll-versions-select">
                      <label for="ht-select-variant">Variant</label>
                      <div class="ht-select-container">
                           <select id="ht-select-variant" class="sp-picker" name="scroll-versions:variant-name" tabindex="-3">
                                 #foreach($variant in $variants.available)
                                     <option value="$variant.value" #if($variant.name == $variants.current.name) selected="selected" #end>$variant.name</option>
                                 #end
                           </select>
                      </div>
                 </div>
             #end

             #if($languages)
                 <div class="ht-scroll-versions-select">
                      <label for="ht-select-language">Language</label>

                      <div class="ht-select-container">
                           <select id="ht-select-language" class="sp-picker" name="scroll-translations:language-key" tabindex="-4">
                                #foreach($language in $languages.available)
                                    <option value="$language.value" #if($language.name == $languages.current.name)
                                    selected="selected" #end>$language.name</option>
                                #end
                           </select>
                      </div>
                 </div>
             #end
        </form>
   </section>
#end
Important: This is where you fill in your versions with the options, like you are used to, with the value and name. (<option value="ver10">Ver 10</option>) The if condition is here to find out what the currently selected version is.
If you want to keep the variant picker and language picker too, you can combine the HTML that already exists in the sidebar. The main difference here, is that we tell the select that it is of "data-type master-private-space" You can read that option in javascript to determine how to handle the link.
Step 3: In your assets/js/theme.main.js file on ~ line 535, there is a function called toogleDropdown. Overwrite it with the following (the function closes with a } before the comment Init Footer)
function toogleDropdown(container, open) {
    if (open) {
        $('body').bind('click', function (e) {
            e.preventDefault();
            if ($(e.target).is(container.find('*')))return;
            toogleDropdown(container, !open);
        });

    } else {
        $('body').unbind('click');
    }

    var toggle = container.find('.ht-select-button');
    var dropdown = container.find('.ht-dropdown');

    if (open) {
        toggle.addClass('active');
        dropdown.addClass('open');

        $.each(dropdown.find('li'), function (index, val) {
            $(this).bind('mouseover', function () {
                dropdown.find('li a').removeClass('hover');
                $(this).find('a').addClass('hover');
            });

            $(this).find('a').bind('click', function (e) {
                  var container = $(this).parents('.ht-select-container')
                var selectType = container.data('type')
                var masterPrivateSpace = false
                if (selectType == 'master-private-space') {
                    masterPrivateSpace = true
                }
                e.preventDefault();

                var name = $(e.target).closest('a').attr('data-scroll-integration-name');
                var value = $(e.target).closest('a').attr('data-scroll-integration-value');
                var title = $(e.target).closest('a').attr('data-scroll-integration-title');

                toggle.find('span').text(title);

                  if (masterPrivateSpace && location.href.match('/'+currentPathPrefix)) {
                      console.log(value)
                 location.href = location.href.replace('/'+currentPathPrefix, '/'+value)
                } else {
                    var target = window.location.pathname + '?' + name + '=' + value;

                    var context = toggle.closest('form').find('input[name=context]').val();
                    if (context) {
                        target += '&context=' + context;
                    }

                    window.location.href = target;
                }


            });
        });
    } else {
        toggle.removeClass('active');
        dropdown.removeClass('open');
    }
}
If everything has been implemented correctly, you can now switch between versions using the styled select.
Remember to correctly set up your versions as <option>'s as explained in step 2.